Front Gear Train
NOTE: For front gear train engines, the front gear cover must be removed in order to remove the front crankshaft
seal. Refer to the next disassembly step for removing the front gear cover.
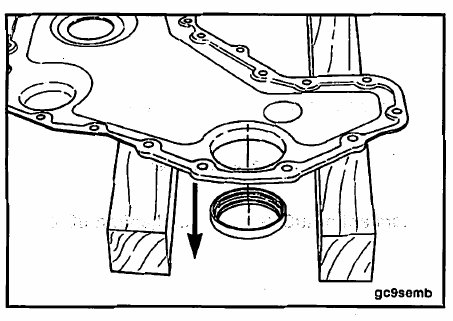
Support the front gear cover on a flat work surface with wooden blocks. Use a suitable punch and hammer to drive
the old seal out of the front gear cover from the back side of the cover to the front side.
NOTE: Some engines can have an additional dust seal installed in front of the front crankshaft seal.
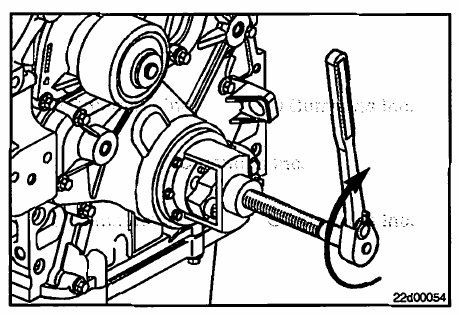
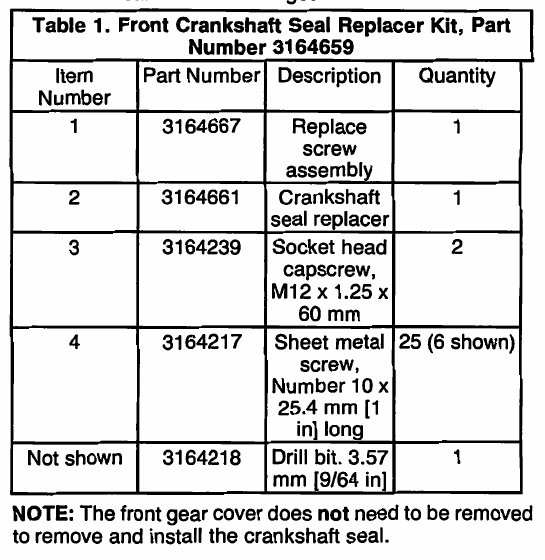
Use tool, Part Number 3164659, to remove the front crankshaft seal from the front gear cover.
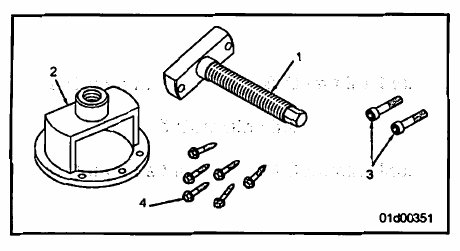
Mount the replacer screw assembly (1) onto the crankshaft nose.
Install the two M12 x 1.25 x 60-mm socket head capscrews (3).
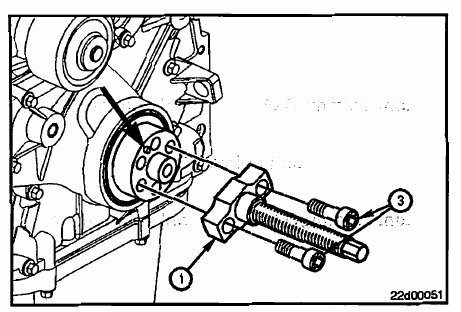
Lubricate the replacer screw with anti-seize or a suitable grease.
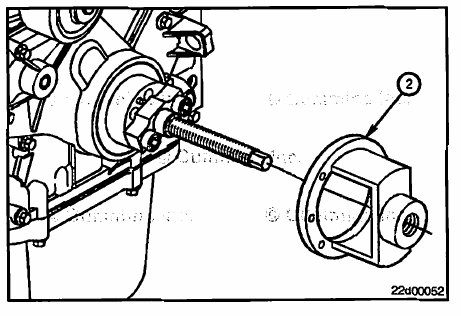
Hold the replacer screw and install the crankshaft seal replacer (2) onto the replacer screw assembly. Advance
the crankshaft seal replacer toward the seal by rotating it clockwise until it is positioned against the front gear cover.
Service Tip: Because of space restrictions, it may be necessary to use a compact right angle drill. Also, it may be necessary to shorten the drill bit used to drill the sheet metal screw holes.
NOTE: The flange of the crankshaft seal replacer is 8 mm [0.32 in] thick.
Mark the drill to a depth of 18 mm [0.71 in] with tape for drill depth control and apply grease to the drill to catch the
chips. Stop frequently to remove the chips.
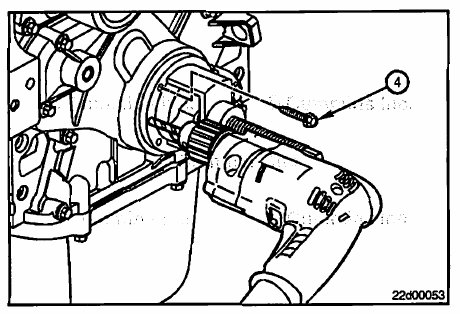
With the crankshaft seal replacer positioned against the front gear cover, drill one hole 10 mm [0.39 in] deep. Make
sure the marking tape has not moved from the original position.
Install one sheet metal screw (4) into the seal to hold the crankshaft seal replacer in position.
Drill five additional holes 10 mm [0.39 in] deep and install the additional five sheet metal screws.
NOTE: Make sure all six sheet metal screws are threaded through both the inner and outer seal casings. The sheet
metal screws need to be uniformly tightened in order to pull out the inner and outer casings of the seal together.
Slowly rotate the replacer screw clockwise until the seal is removed. Do not exceed torque value.
Torque Value: 33 N•m [ 24 ft-lb]
NOTE: If the sheet metal screws pull out of the seal or only the inner casing pulls out, stop the removal
operation. Rotate the replacer screw counterclockwise to force the inner casing back. Remove the sheet metal screws, slightly reorient the tool, drill new holes, and install the sheet metal screws in the new locations.
Complete the removal procedure, remove the tool, and discard the old seal.