REMOVAL
1. Remove oil pan.
2. Remove the rear main bearing cap.
3. Remove rear main bearing insert and old seal.
4. Clean bearing cap and seal grooves and inspect for cracks.
INSTALLATION
1. Coat seal groove with 1052621 sealer or equivalent (Loctite 414 or Fel-Pro 361).
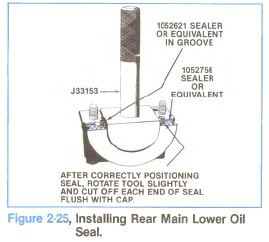
2. Within one minute, install seal into bearing cap, packing by hand. Using seal installer J33153, drive seal into groove. (Figure 2-25).
To check if seal is fully seated in the bearing cap, slide the tool away from seal. With tool fully seated in the bearing cap, slide tool against the seal. If undercut area of tool slides over the seal, the seal is fully seated. If tool butts against the seal, the seal must be driven further into the seal groove. Rotate tool before cutting off excess seal packing.
3. With tool slightly rotated, cut seal flush with mating surface. With screwdriver, pack seal end fibers towards center, away from edges. Rotate seal installer when cutting seal to avoid damage to tool.
4. Clean bearing insert and install in bearing cap.
5. Place a piece of plastic gaging material on the rear main journal. Install the rear main bearing cap and torque to 95 N-m (70 ft. lbs.).
6. Remove the rear cap and check the plastigage for bearing clearance (.0022″-.0037″). If it is out of specification, recheck the ends of the seal for fraying, that may be preventing the cap from fully seating.
7. Clean crankshaft bearing journal and seal contact. Install sealer 1052756 or equivalent on cap as shown in Figure 2-25.
8. Install bearing caps, lubricate bolt threads with engine oil and install. Torque bolts to inner 135 N-m (100 Ft. Lbs.), outer 150 N-m (110 Ft. Lbs.).
9. Install pan with new gaskets.
10. Install flywheel lower cover.